Orchestrating Pipelines with Dagster
A complete guide on how to integrate dbt with Dagster and an automated CI/CD pipeline to deploy on an AWS Kubernetes cluster.
With so many different components in an ETL project, orchestrating everything to work together is a challenge. The main goal is an automated infrastructure that is reproducible, scalable, and reliable, with accurate, high-quality data.
Open-source data orchestration tools like Airflow, Luigi, Prefect, Argo, and Dagster all attempt to achieve this. This post focuses on Dagster.
Why Dagster?
Dagster is designed to manage every step of a data-oriented project's lifecycle. With this cloud-native orchestrator, you can define a pipeline with a few lines of code and observe its state from the Dagit UI — a web-based interface that simplifies execution and debugging.
Dagster supports parameterizing execution and directly inspecting outcomes using functions that model inputs and outputs. Pipelines can have different modes like test and prod for resource definition at runtime — for example, a test pipeline persists data to a local Postgres instance, while prod stores data in a cloud service like RDS or BigQuery.
In comparison to Airflow, Dagster is faster to define pipelines, as it can execute operations completely in-memory, without a database. One of its key features is effortless integration with dbt.
Getting Started
Get a free API key on OpenWeather and export it as an environment variable:
export API_KEY=<your_openweather_api_key>Authenticate on AWS
After downloading the AWS CLI and creating an IAM user, run:
aws configureYou will be prompted to provide the access key ID and secret access key.
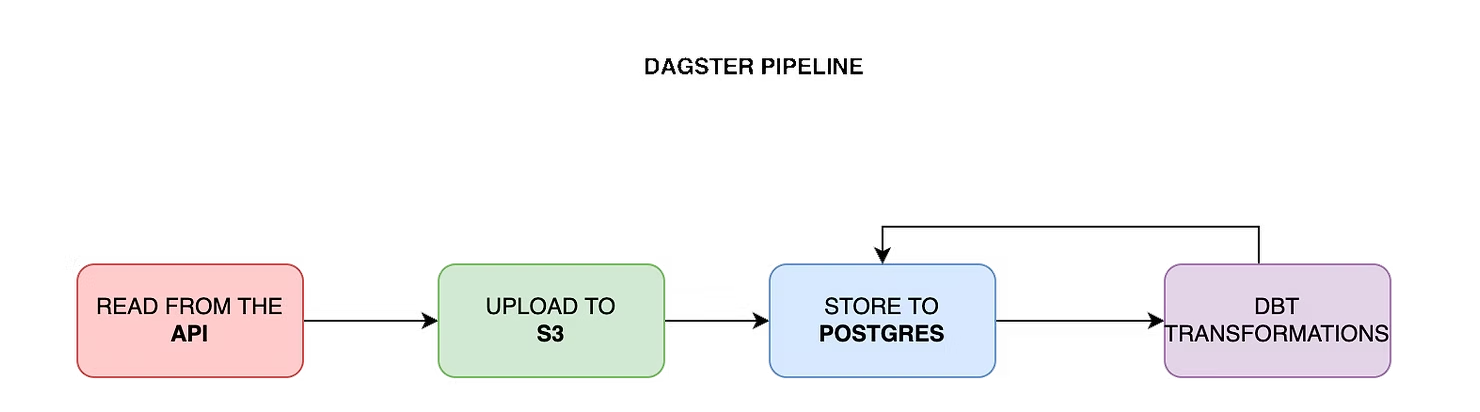
Building the Pipeline
1. Fetch weather data from OpenWeather API
The following is a Dagster op (a node of the DAG) that requests current weather data for a list of cities:
from dagster import op
import requests

CITIES = ["Munich", "Berlin", "Hamburg"]

@op
def fetch_weather(context):
    results = {}
    for city in CITIES:
        response = requests.get(
            "https://api.openweathermap.org/data/2.5/weather",
            params={"q": city, "appid": os.environ["API_KEY"]},
        )
        results[city] = response.json()
    return results
2. Store the JSON response on S3
Using IAM credentials, authenticate to S3 and upload the JSON response to an S3 bucket (provisioned by Terraform):
import boto3

@op
def store_on_s3(context, weather_data):
    s3 = boto3.client("s3")
    for city, data in weather_data.items():
        s3.put_object(
            Bucket="your-s3-bucket",
            Key=f"weather/{city}.json",
            Body=json.dumps(data),
        )
3. Fetch from S3 and store in Postgres
Open a database connection, read the JSON files from S3, and write each record to a Postgres table:
import psycopg2

@op
def load_to_postgres(context):
    conn = psycopg2.connect(os.environ["DATABASE_URL"])
    cursor = conn.cursor()
    s3 = boto3.client("s3")
    objects = s3.list_objects_v2(Bucket="your-s3-bucket", Prefix="weather/")
    for obj in objects.get("Contents", []):
        body = s3.get_object(Bucket="your-s3-bucket", Key=obj["Key"])["Body"].read()
        cursor.execute(
            "INSERT INTO json_file (data) VALUES (%s)",
            [body.decode("utf-8")],
        )
    conn.commit()
4. Use dbt to extract relational data from JSON records
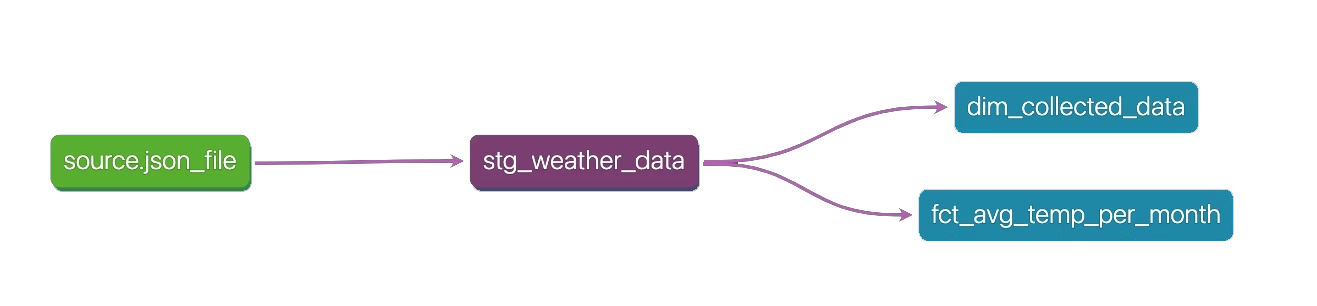
With the data in Postgres, use dbt to extract nested JSON attributes into proper columns in a weather_data table.
5. Create dimensions and facts with dbt
dbt makes it easy to transform data into fact and dimension tables. Its built-in DAG shows the order in which queries are executed.
6. Integrate dbt and orchestrate with Dagster
Define a dbt resource with the project and profiles directory, then connect it with a Dagster resource that opens the Postgres connection:
from dagster_dbt import dbt_cli_resource, dbt_run_op
from dagster import job, repository, schedule
dbt_resource = dbt_cli_resource.configured({
"project_dir": "/path/to/dbt/project",
"profiles_dir": "/path/to/dbt/project/profiles",
})
@job(resource_defs={"dbt": dbt_resource})
def weather_pipeline():
data = fetch_weather()
stored = store_on_s3(data)
loaded = load_to_postgres(stored)
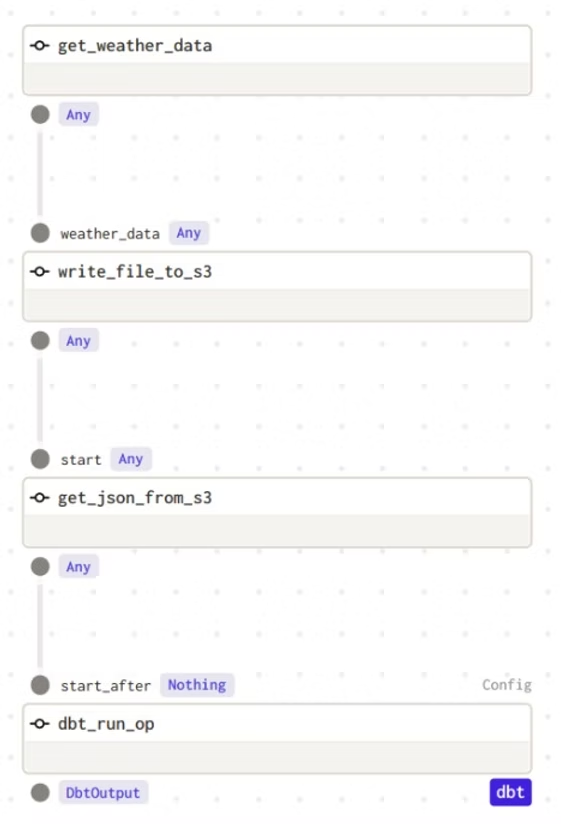
dbt_run_op(loaded)7. Operation dependencies in Dagster
Execution is sequential — each op waits for the previous one to finish. This is expressed by passing one op's output as another's input:
@repository
def weather_repository():
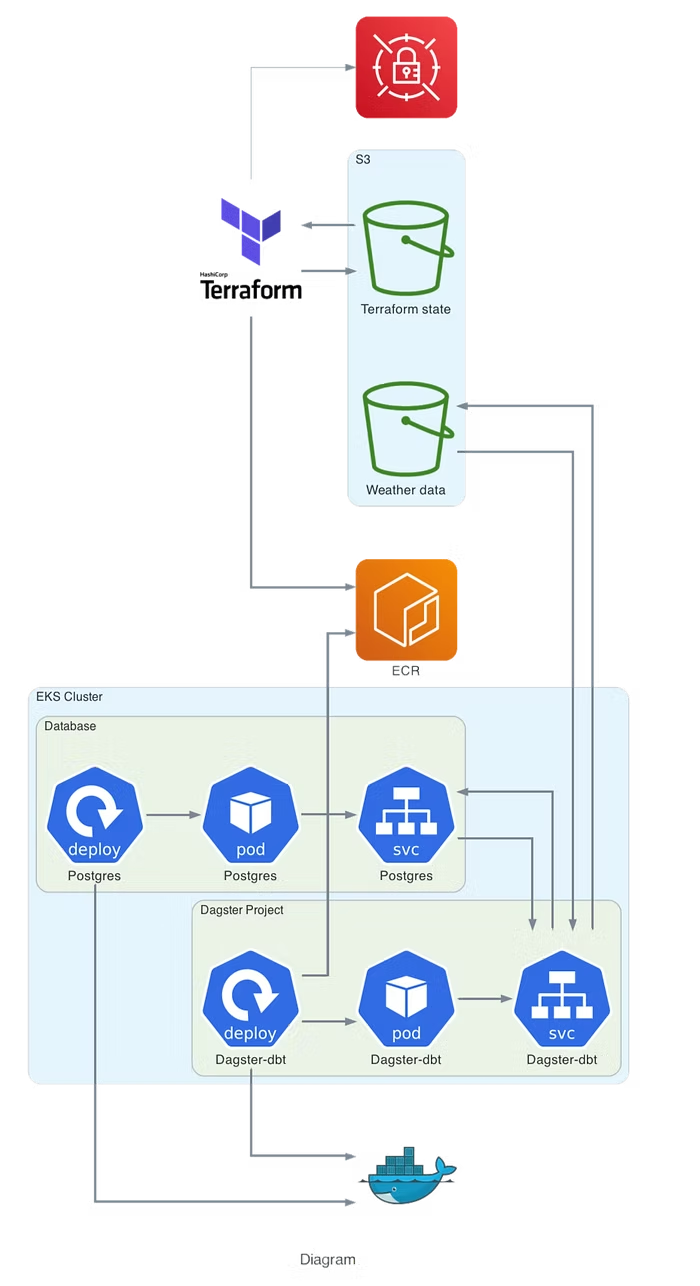
return [weather_pipeline, weekly_schedule]8. Provision infrastructure on AWS with Terraform
The Dagster project is built as a Docker image, pushed to ECR, and deployed on a Kubernetes cluster provisioned by Terraform. After the cluster is running, configure kubectl:
aws eks update-kubeconfig --name <cluster-name> --region <region>Deploy using the provided Makefile (logs in to ECR, builds and pushes the Docker image, then applies the new image with kubectl):
make ecr-pushOnce Dagster and Postgres are deployed, forward the Dagit UI port to access it locally:
kubectl port-forward service/dagster 3000:3000Then open http://localhost:3000 to manually trigger and monitor the pipeline.
Summary
Dagster is a very easy-to-setup tool with many integrations. It makes ETL pipeline implementation, scheduling, and monitoring more straightforward and easier to debug. For any questions, feel free to reach out to us at hello@datamax.ai.
DataMax Team
DataMax Team